Custom Robots Header Tags are the most important part of any Blogger Blog /website. It can boost your organic traffic or can destroy your website SEO. You must need to know about the Custom Robots Header Tags before you enable this on your Blogger.
In this article, We will learn how to use custom robots header tags properly on Blogger and their purpose. If you want to increase your website traffic, should continue to read this article otherwise you can leave it here, I’ve No problem.
What are Custom Robots Header Tags?
they allow the Search bots to index or deindex your website. It can boost your organic traffic or can destroy your website SEO if you don't use them properly.
Custom Robots Header Tags Purpose
1. all – Crawlers are not restricted / bounded by any constraints. They can freely crawl, index your website.
2. noindex – This tag is use to prevent the crawler to index your website. You can also use this tag for a specific page or your personal / private blog. Suppose you don't want to index privacy policy, terms and conditions, disclaimer, and abouts-us pages. you can easily prevent or stop bots crawler to index these pages.
3. nofollow – Hope you already know about the types of link. No-follow and Do-follow are the types of outbound links you use in your website. Do-follow link is sneaked by search engine. That means clawler will follow the link of your articles and also index them. You can change this to nofollow if you want to prevent the crawler to sneak the links.
4. none – It contains the features of both noindex and nofollow tags. The crawlers will neither index your pages nor sneak/skid through the links.
5. noarchive – It tells the google not to create caches for this post/page. If you enable this tag, Google create a replica for this post/page. Google will also tell when you visit this page last time and indexed by Google bot.
6. nosnippet – In search results, the text snippets help people to find what’s on the web-page. You can turn this header tag on if you want to keep the content exclusive.
7. noodp – Open Directory Project (ODP) is a man-made directory of websites. It is also known as Dmoz . Sometimes, Google and other search engines use the information from there . You can check this tag if you want to use it.
8. notranslate – Every website is written in a specific language. If you check this tag people from other areas can't get the translation.
9. noimageindex – If you unchecked this header tag, Google will index your images. People may steal it and can use it on their own websites. To prevent this, you can keep the images no-indexed using noimageindex tag.
10. unavailable_after – In Blogger, This tag is helpful when you want to deIndex your post after a specific time. Concert, parties, and events are the best example of this tags.
Also Read:
Also Read:
How to Setup Custom Robots Header Tags
Step 1: Login to your Blogger Account. Choose the blog from your blogs which you want to the custom robots header tag.
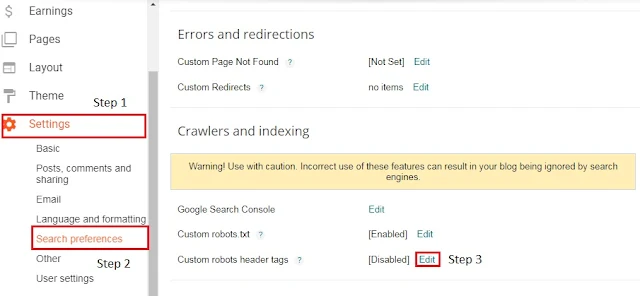
Step 2: Then go to Settings >> Search preference. Scroll down and You will see crawlers and indexing.
Step 3: Now You have two options. Click on yes to enable custom robots header tags.
Step 4: It is the best settings for Custom robots header tags for blogger blog. You can change according to your choice by reading above guide lines carefully.
Conclusion
I've explained everything about the custom robots header tags settings. If you have further question related to this post. ask in the comment section. If this article is helpful please share it with your friends and don't forget to like our facebook fan page.


